One you have decided to start selling on Amazon, how to sell or how to become an amazon seller is the first and foremost question that pops up in our mind. For some, Amazon Seller Account Registration Process may be very simple but for a lot of people who are not as used to technology, it is a challenge in itself. But no need to worry! Just follow the steps I am sharing in this article carefully.
Before you start the process to register on Amazon as a seller, make sure you go through the rules and regulations. A lot of times, even a small mistake can lead to account suspension, before you even start selling.
So, here is what I will cover in this article:
- Prerequisites or requirements to register as a seller on Amazon
- How to Register on Amazon as a seller – Step by Step Instructions with screenshots
- Common queries related to Amazon Seller Account registration
- Mistakes to avoid when registering on Amazon to sell.
And in case you have any further queries after reading the article, you can always ask in the comments below and I will try to answer them within 48 hours! 🙂
Don’t want to read? Jump to Video (in Hindi)
Table of Contents
Pre-requisites or Requirements to sell on Amazon
In order to register on Amazon as a seller, you need to fulfill certain basic requirements. And to verify that, Amazon requires you to submit certain documents at the time of registration. All you need to register on Amazon as a seller is:
- PAN Card – If you want to register as an individual, you have to provide your individual PAN number. If you want to sell as a company, then you need to submit your company’s PAN Number.
- GST number – GST is a must for eCommerce. So, unless you have a GST Number, you can not sell on Amazon.
- Bank Account Details – Savings or Current Account, both are ok to use. You will need to submit a canceled cheque of the bank account you want to use for payments.
- Email-ID – Use a unique email-d that has not been used to register on Amazon before.
- Phone Number – This again should be a unique Phone Number that is not associated with Amazon.
Mistakes to Avoid When Registering as a seller on Amazon
Before we get into the step by step process of Amazon Seller Account Registration, it is important to know what mistakes to avoid. Certain mistakes can create issues later and may also lead to account suspension before you even start selling.
- Do not create multiple accounts with the same details under any circumstance. This can lead to Account suspension due to Multiple Seller Accounts. Read more about it here 👉 Amazon Account Suspension due to Multiple Seller Accounts
- Do not mix business details of 2 or more people or business entities. GST, PAN No. & Bank Account Details should be of the same person or business and Business Name should match the name on these documents.
- Never provide incorrect details. It can lead to problems in the future.
- Double-check the GST slab applicable for the products you plan to sell and select the Tax Code correctly while registering your seller account. Misleading can create problems for you in the future when filing GST returns.
- Make sure you always have brand authorization letters and invoices for all products that you list on Amazon. This is not important for registration but before you start selling on Amazon, it is important that you know this. Amazon can ask you for these documents at any time. And if you fail to provide them, then your account will be suspended. [Learn more about Inauthentic Product Claims on Amazon]
Amazon Seller Account Registration – Step by Step Process
Once you have the above-mentioned details, Amazon Seller Account Registration is a very simple process:
- Open Amazon Seller Account Registration Form
- Step 1: Create a new account
- Step2: Submit Seller Information
- Step 3: Submit Tax Details
- Step 4: Seller Interview
- Step 5: Seller Central Dashboard
I will now explain each step in detail along with screenshots.
Open Amazon Seller Account Registration Form
To open the Amazon Seller Account Registration Form, click on this link Amazon Seller Registration Form.
Or you can follow the steps below to get to the registration form.
- Go to Amazon.in. In the menu, you will see ‘sell’. Click on it.

Click on Sell, to Start amazon seller account registration process - Click on ‘Start Selling’. This will open up the Login Page for Amazon Seller Central.
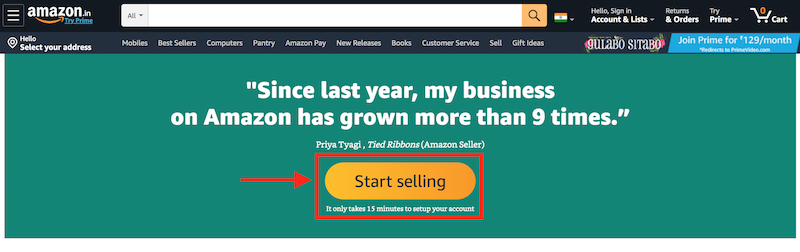
Start Selling on Amazon. - If you already have a customer account, you can use that to log in and proceed with the registration. If not, create a new account. At the bottom of the Login Form, you will see a button ‘Create your Amazon account’. Click on it to open the registration form.
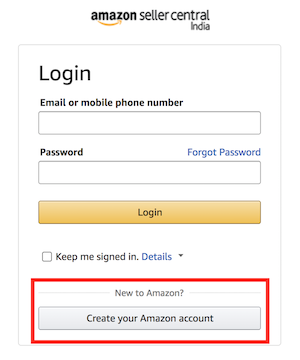
Click on Create your Amazon Account for new Amazon Seller Account Registration - You will see a page with ‘Create Account’ form as below where we will submit the details to register as a seller on Amazon.
Step 1: Create A New Account
Now that we have the registration form open, I will take you through the steps of the registration process.

- Enter your name, phone number, Email-Id, and a password that is at least 6 characters. Then click on ‘Continue’. Note that submitting an email id at this stage is optional. However, you will have to submit an email id later.
- Once you click on ‘Continue’, a new page ‘Verify mobile number’ will open up. And You will receive an OTP on the phone number that you submitted just now.
- Enter OTP and click on ‘Create your Amazon account’
- Email address required – You will see this screen if you did not enter the email id earlier. Once you click on ‘Create your Amazon account’, Amazon will ask you for your Email Address that you want to use for future communications with Amazon. This is where you will receive all notifications from Amazon regarding your Seller Account. And you can also use this to log in to your Amazon Seller Account. Enter the email id and choose a password you want to use to login to your account and click on continue.
This will take you to a new page – ‘Register and Start Selling’
Step 2: Register and Start Selling – Submit Seller Information
- Enter Name of Company or Business Name under which you want to sell on Amazon. This name should be the same as that registered in GST and PAN. Mark the checkbox for Seller Agreement and click on continue.
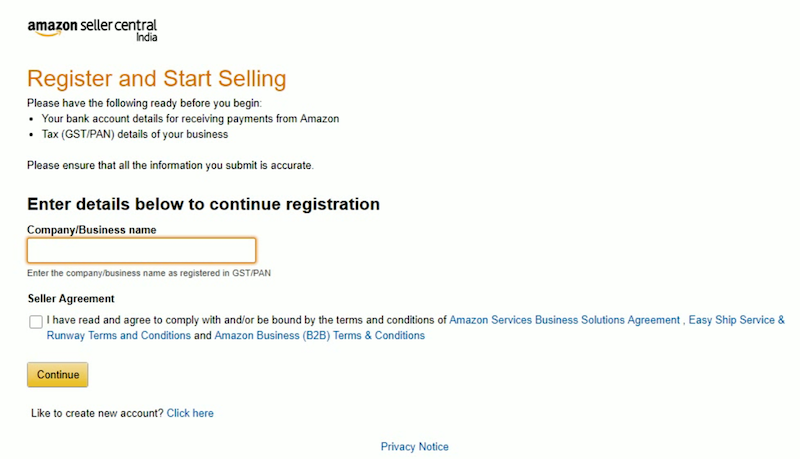
Amazon Seller Account Registration – Step 2: Submit Seller Information - Amazon will verify the details submitted by you to ensure that an account with that name or details does not already exist on Amazon. It will then take you to your Seller Central Page where you can fill in all other information.
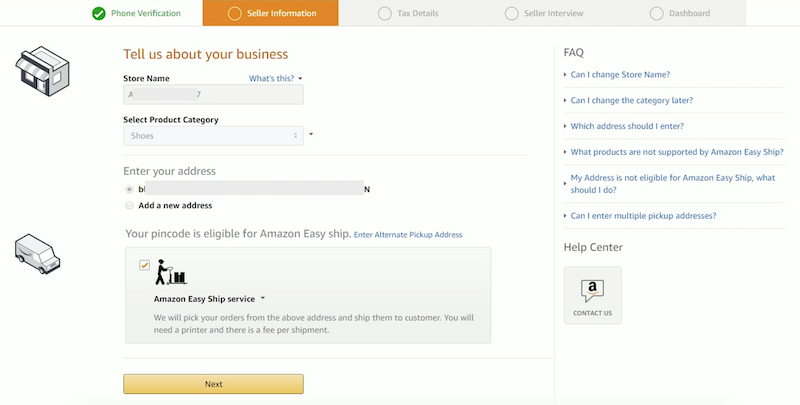
Amazon Seller Account Register – Submit Seller Information - Enter Store Name as you want it to appear on Amazon. This is the name that will be displayed to the buyers for your Amazon Listings and Seller Profile. This can be anything but has to be unique. Click on verify, to ensure that the store name is available. You can change this Store Name anytime through the store info area in your seller account.
- Choose the Primary Product Category you want to sell in. You will get a chance to select more categories later. [Click here to check the list of product categories that Amazon offers and associated commission charges]
- Enter Address and click on ‘continue’.
- Amazon will then verify the address and check eligibility for Easy Ship. Make sure you add the correct address from where you will be shipping the products.
- If you want to opt for Easy Ship, select the option and click on Next. You can also decide this later. [Click here to know what is Easy Ship Program.]
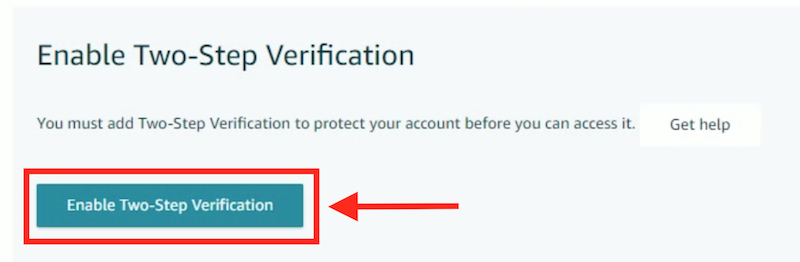
- After this Amazon will ask you to enable 2-step verification for added security. Click on ‘Enable Two-Step Verification’.
Enable Two-Step Verification for Amazon Seller Central Account Login - Once, 2-step verification is set up, under ‘Suppress OTP challenge during Sign-in’, you can select the option ‘Don’t require OTP on this browser’. So that you don’t have to enter the OTP every time you sign in using this browser on the computer/laptop you used to sign-in this time.
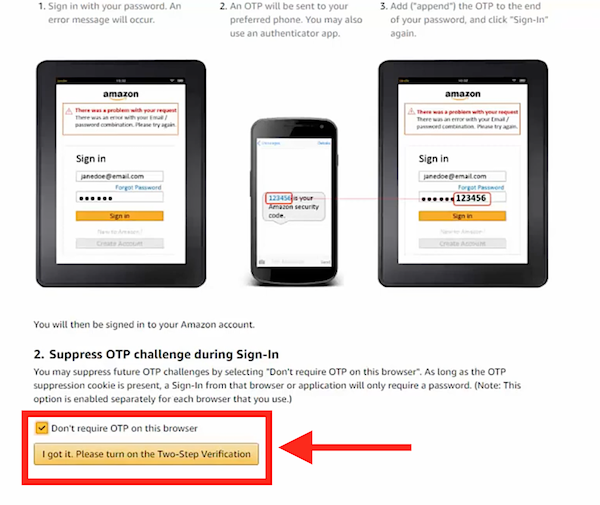
Enable Suppress OTP Challenge during sign-in for the browser you are using to register your Amazon Seller Account - Click on ‘I got it. Please turn on the Two-Step Verification’. This will take you to the next step – Tax Details
Step 3: Submit Tax Details
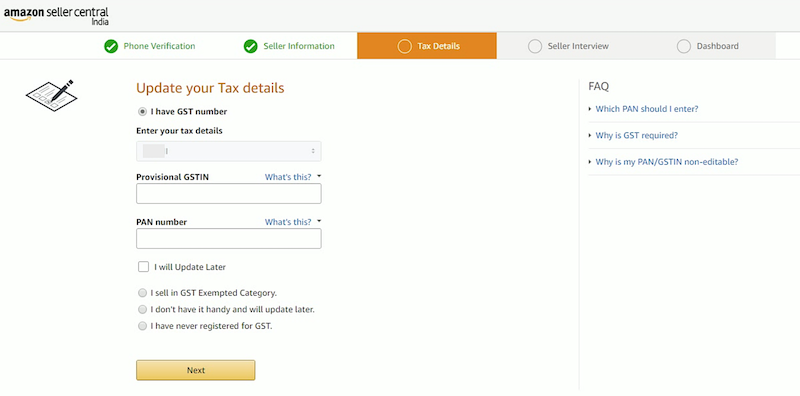
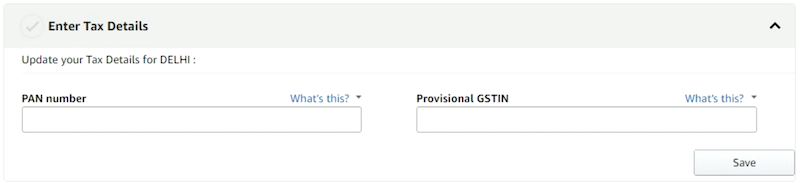
- Enter GSTIN and PAN Number and click on Next.
- You can also skip this step by selecting ‘I will update Later’. However, you can not start listing your products unless you have submitted GST and PAN details.
- In case you have not registered for GST or want to sell in GST Exempted Category, you can select that option and click on Next.
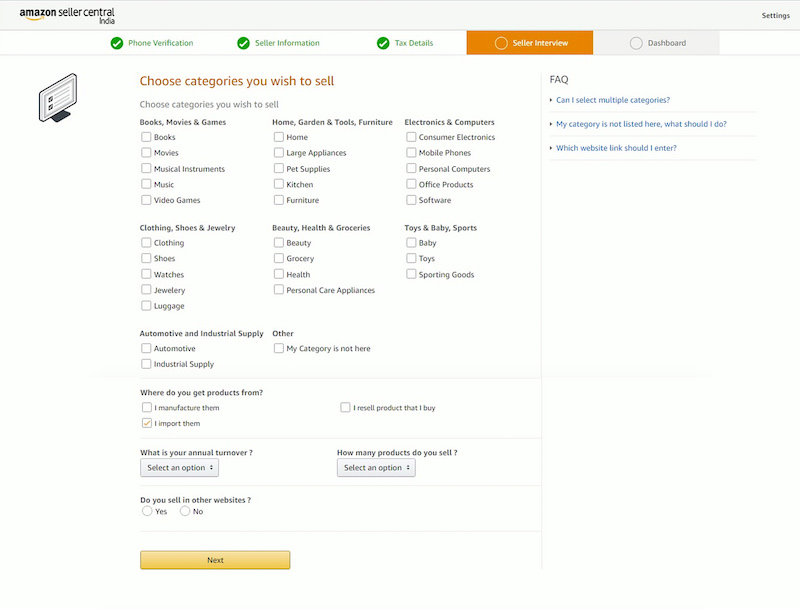
Step 4: Seller Interview
Don’t worry. This is not really an interview. You just need to provide answers to the following questions on screen and click next.
- Choose Categories you wish to sell.
- Where do you get products from?
- What is your annual turnover?
- How many products do you sell?
- Do you sell on other websites?
Step 5: Amazon Seller Central Dashboard
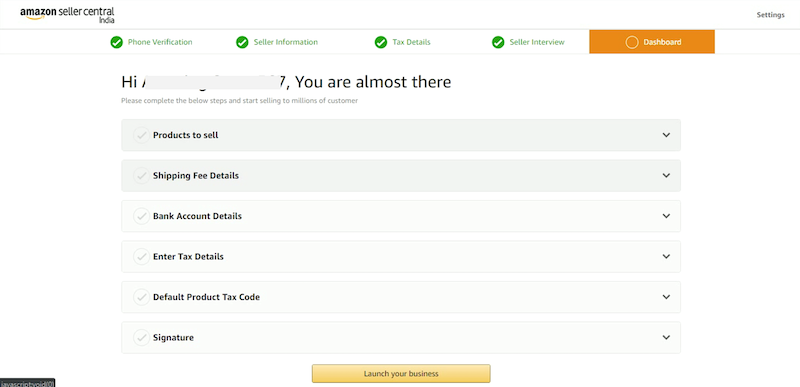
This is the final step. List your products, Set Shipping Charges, Submit Bank Details, Enter Tax Details, Set Default Product Tax Code and add signature.
- Products to sell – This is basically to start listing your products. You can leave this step for now.
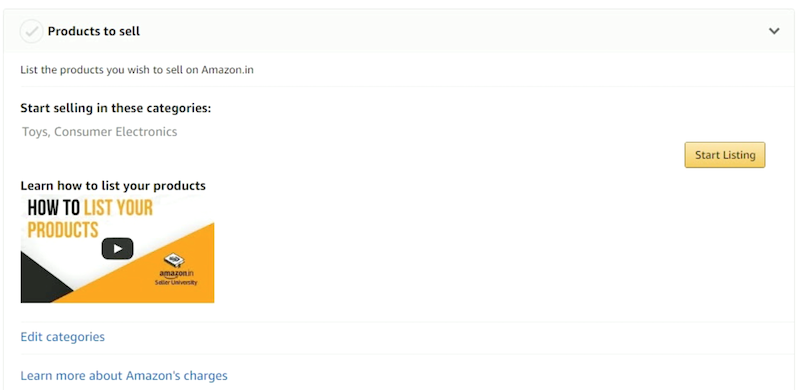
Product Listing – This can be done later, once you have submitted all other details. - Shipping Fee Details – Depending on whether you chose Easy Ship or not, this will take you through the steps to set up shipping rates.

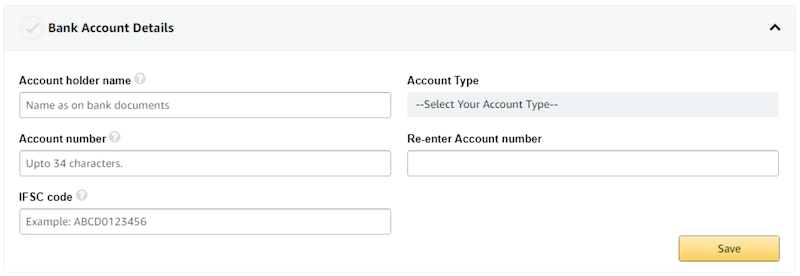
Enter Shipping Fee Details. - Bank Account Details – Enter details of the bank account that you want to be associated with Amazon and click on save. This is where you will receive payments from Amazon.
Submit your Bank Account Details. Bank Account Should be in the name of same person or entity as mentioned on PAN and GST - Enter Tax Details – If you did not enter PAN Number and GST before, enter these details here and click on Save.
If you did not submit this at the beginning of the Registration Process for Amazon Seller Account, you can enter your PAN and GST here. - Default Product Tax Code – Product Tax Code or PTC is the GST Tax Bracket that your product comes under. In the dropdown, you will see a list of codes with the GST percentage in the bracket. Double-check the GST applicable on the products you plan to sell and select the Product Tax Code accordingly.
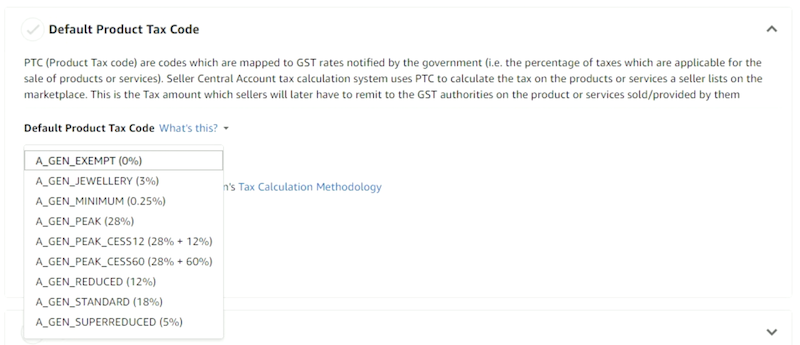
Amazon Default Product Tax Codes (PTC) 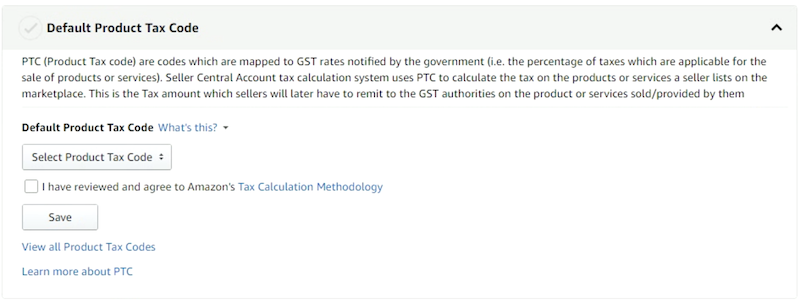
Select the Default Product Tax Code – GST slab for your primary category of products - Signature – Upload a scanned copy of your signature. This will be used on the invoices that are sent to the customers.
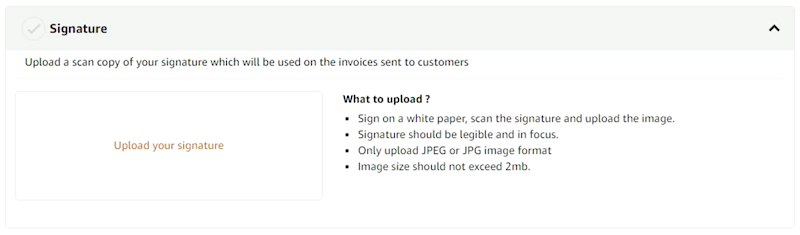
Final step for Registering your Amazon Seller Account – Upload Signature
Once you have updated all this information. Click on ‘Launch Your Business’ and you are done! You will be redirected to your Amazon Seller Central Dashboard.
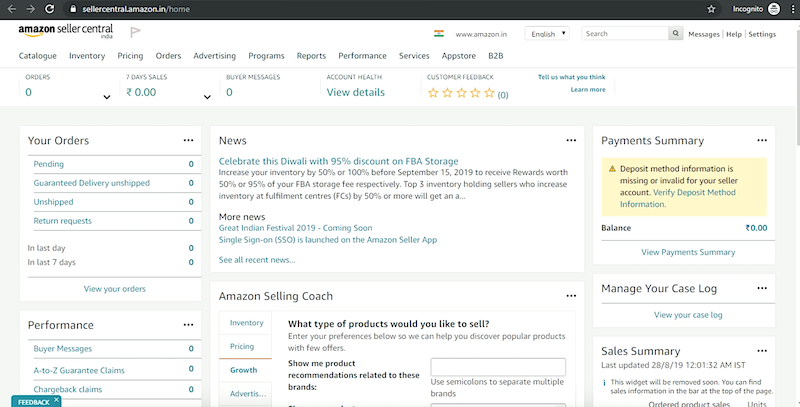
From now on, every time you log in to your Amazon Seller Account, you will first see this Dashboard.
Amazon seller central or seller dashboard provides you information like order summary, performance reports, payment summary, case log, sales summary, promotions & offers, and much more. This is where you control everything on your account from – listing, pricing, ads etc.
This was the complete registration process in detail. In case you have any queries, you can ask in comments below and I usually answer within 48 hours. You can also reach out to me on any of the following social handles:
Youtube: AmazingMarketer
Facebook: @AmazingMarketer.in
Instagram: @amazing_marketer
Video in Hindi
And now time for some common Queries by sellers!
Frequently Asked Questions (FAQ)
No! GST is mandatory for e-commerce. You will need to take a GST no. if you want to sell on Amazon or any other eCommerce platform.
You can, however, skip the GST information temporarily during the registration process and provide it later once you have it. But you will not be allowed to list or sell any products until you have submitted GST details.
Yes, you can register for GST based on your individual PAN Card. If you are doing business in your name, it is basically a sole proprietorship. For more details on GST Registration Process, Documents required to register GST and other related queries, you can watch the video 👉 GST Registration Process
Company Name/Business Name should be the same as that on your PAN Card and GSTIN Document. If you are using your individual PAN Number, then it should be your name exactly as printed on PAN and GST documents.
No, Seller Registration on Amazon is absolutely Free as well as Listing your products. You only pay a commission on every product you sell through Amazon.
Every product category has a set commission fee. Apart from that there are few other charges that are applied when you sell a product.
For more details on Amazon Seller Fees, please check Category wise Amazon Seller Commission Charges in India (2020)
Amazon Easy Ship is a shipping service that Amazon provides to its sellers in which it picks up the order from your warehouse or pickup address and delivers it to the customer through one of its logistics partners. For this, it charges weight and distance-based shipping fees like any other courier service.
For Easy Ship Fee details, visit 👉 Amazon Easy Ship Weight Handling Charges in India
Yes, You can give a different pickup location.
You can use any email ID. However, I always advice creating a separate email ID for your business and using that so that emails from Amazon do not get mixed up with your personal emails. Also, make sure you check that email ID regularly as Amazon will use it to communicate any kind of notification.
Create your signature on a blank paper and take a photo or scan it using any scanning app on your phone. If you have a scanner available, you can scan it directly on your computer or laptop. Make sure the scanned image or photo is less than 2MB. Click on ‘upload your signature’ and select this file from your computer to upload.
No, You can provide only 1 pickup address.
Yes you can. But in that case, all other details should also be related to that only.
Amazon takes from 15 min up to 24 hours to list your products properly.
Yes, I can help you register as a seller on Amazon. You can check the Amazing Marketer Services page for Account Registration charges and also the complete list of other services I provide.
Still have doubts? Ask in comments below!
To get regular updates and announcements made by Amazon India, you can subscribe to my Youtube Channel or follow me on Instagram, Facebook or Twitter.
Sharing is Caring! Do not forget to share this with your friends 👇
——– If you still have any concern regarding Amazon or any other Digital Marketing strategies, ASK THE QUESTION in the comments below ——–


I WANT TO OPEN SELLER ACCOUNT BUT I DONT HAVE ANY GST NO. RIGHT NOW AS I AM SELLING HERBAL HOMEMADE SOAPS FROM MY HOME ONLY
Hello,
In my village we dont have names for the streets or numbers , we all live in a private houses , and we just have a p.o.box as adrees , can i use the p.o.box as my adress for registration to amazon fda ?
hi there i want to open Amazon associates account, but i have not any website so what i should do?
Hi Rizwnana,
You will need a website with some traffic to get approved for Amazon Associates Account.
If you have a good following on any of the social media channels, you can try for Amazon Influencer program.
Thanks,
If i use some budy else gst number..and in future if i want to change that gst number and firm name on same account .it is possible..?
Hi Shahzeb,
I have never come across any case where registered company name has been changed. Your seller account is basically registered for a particular entity and changing the entity means it is a separate business so you should be opening another account.
GST number can be changed. However, GST number should always be exactly in the name of company that is used to register the account.
When I will try to register on amazon seller there is shown that duplicate gst show. ..then how can I will register ??
Hi Vinod,
You can not register multiple accounts with same GST.
Amazon does not allow multiple account registrations for the same company.
If you register multiple accounts with same GST, PAN, company name, phone number, email id, pick up address or any such common information, then eventually Amazon will suspend all related accounts.
For more information about this, kindly refer https://amazingmarketer.in/amazon/account-suspension/reopen-seller-multiple-duplicate-account
I want to know what is difference to sell on Amazon FBA? Which merhod is more effective to sell?
Hi Bhumy,
Missed out your query. If you are still looking for an answer, which method is more effective depends on a multiple factors like product, quantity, no. of daily orders, resource availability etc. In case of Amazon FBA, you store your inventory at Amazon Warehouse and Amazon will pack and ship the products as and when the orders come. They will do the customer handling as well. For this they charge a fee.
Amazon FBA definitely has its advantages like higher chances of getting a buy box and chances of better sales. Also, order processing is taken care of by Amazon so you can concentrate on other aspects of your business. However there is a cost associated with it. So you need to figure out if it would make sense for your business in terms of expense and profits.
To understand Amazon FBA in detail and difference between self ship and FBA, you can watch the videos here: https://bit.ly/32CywXz
I have gst and pan on my name, so can i register my shop name with a different name? Can i write company name as different?
Hi Lubna,
For Amazon Seller Registration, Business Name or Company Name should be exactly the same as that on GST and PAN. This is only for reference of Amazon. However Shop Name can be anything and is shown to the customers.
Sir i want to know that .i don’t have printer ..nd i don’t have sufficient budget to buy printer now onwards so how can i print shipping lebels ..? Can you suggest me ..
Hi Rakhi,
You can take the print from any nearby shop providing the facility. Just take the print on normal A4 paper and when sticking it on the package, secure it (cover the entire label) with the transparent tape so that it doesn’t come off or fade during transit.
All The Best!